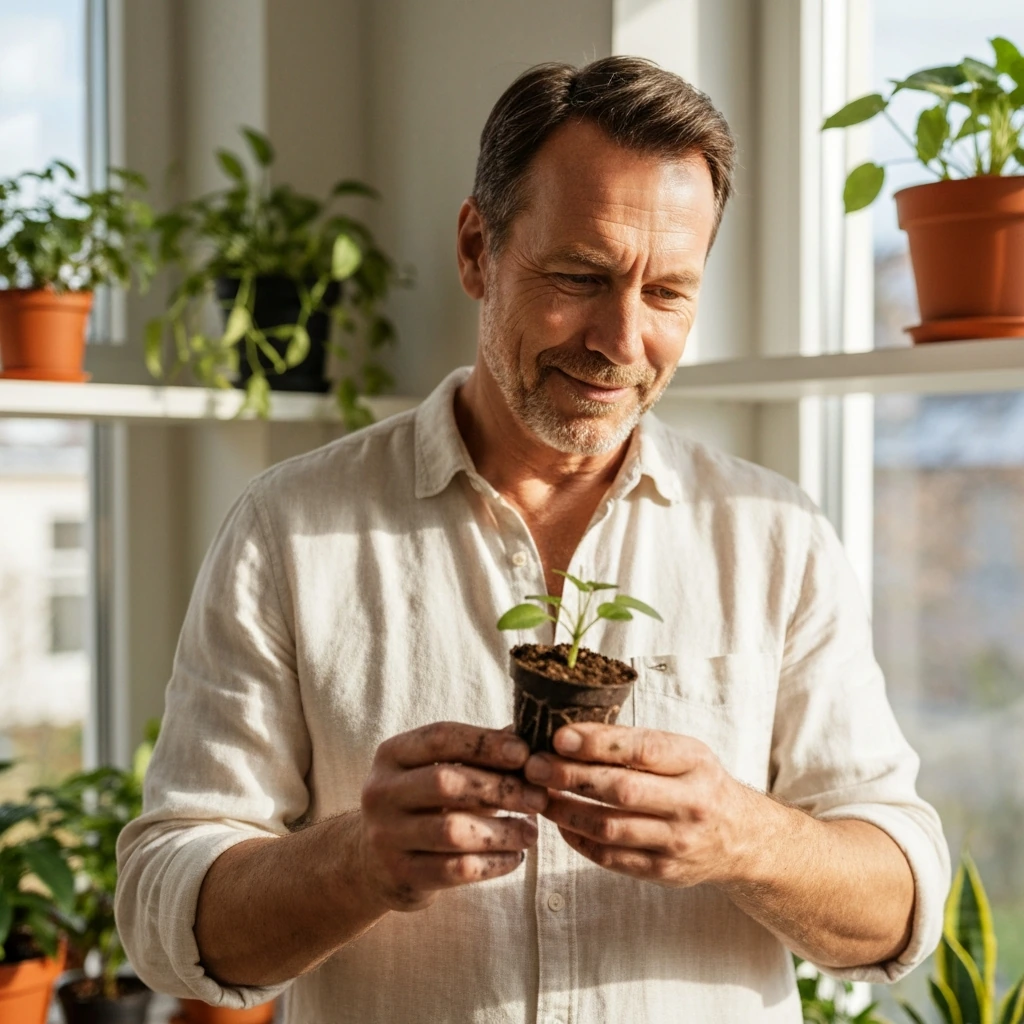
Crops grow through a repeating biological sequence: a seed absorbs water, sprouts a root and shoot, builds leaves to capture light, uses that energy to flower and set fruit or seed, then the cycle ends at harvest. how to grow anything Every step in that sequence depends on the same four inputs, light, water, nutrients, and temperature, and your job as a grower is simply to keep those inputs in the right range at the right time. Whether you're working in a backyard bed, a container on a balcony, a hydroponic bucket, or a terrarium on your desk, the biology is identical. What changes is how you deliver those inputs. This guide walks through all of it, stage by stage, setup by setup. how to grow crops. how to grow food plants
How Do Crops Grow Step by Step for Beginners
Marcus Holloway
24 Mar 2026
The full growth journey: seed to harvest
Every crop goes through the same broad stages, and understanding what the plant is doing at each one tells you exactly where to focus your attention.
Stage 1: Germination
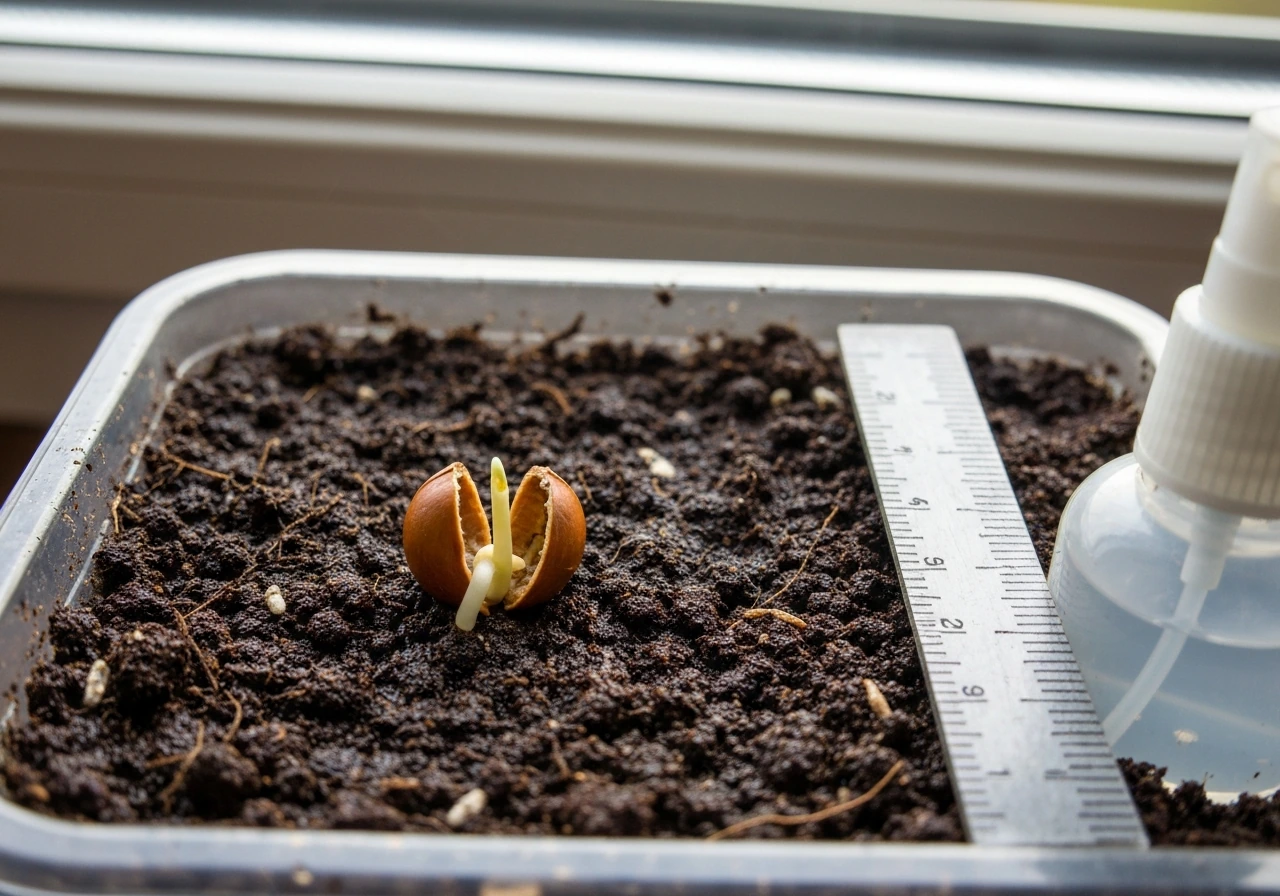
A dry seed is essentially a plant in suspended animation. The moment it absorbs enough water (a process called imbibition), it activates stored enzymes and starts converting its internal food reserves into energy. A root tip (radicle) pushes downward first, then a shoot pushes up. The seed doesn't need light yet, it just needs warmth and moisture. Soil temperature of 75–90°F is the sweet spot for most vegetable crops. Below that range, germination slows dramatically or stalls entirely.
Stage 2: Seedling establishment
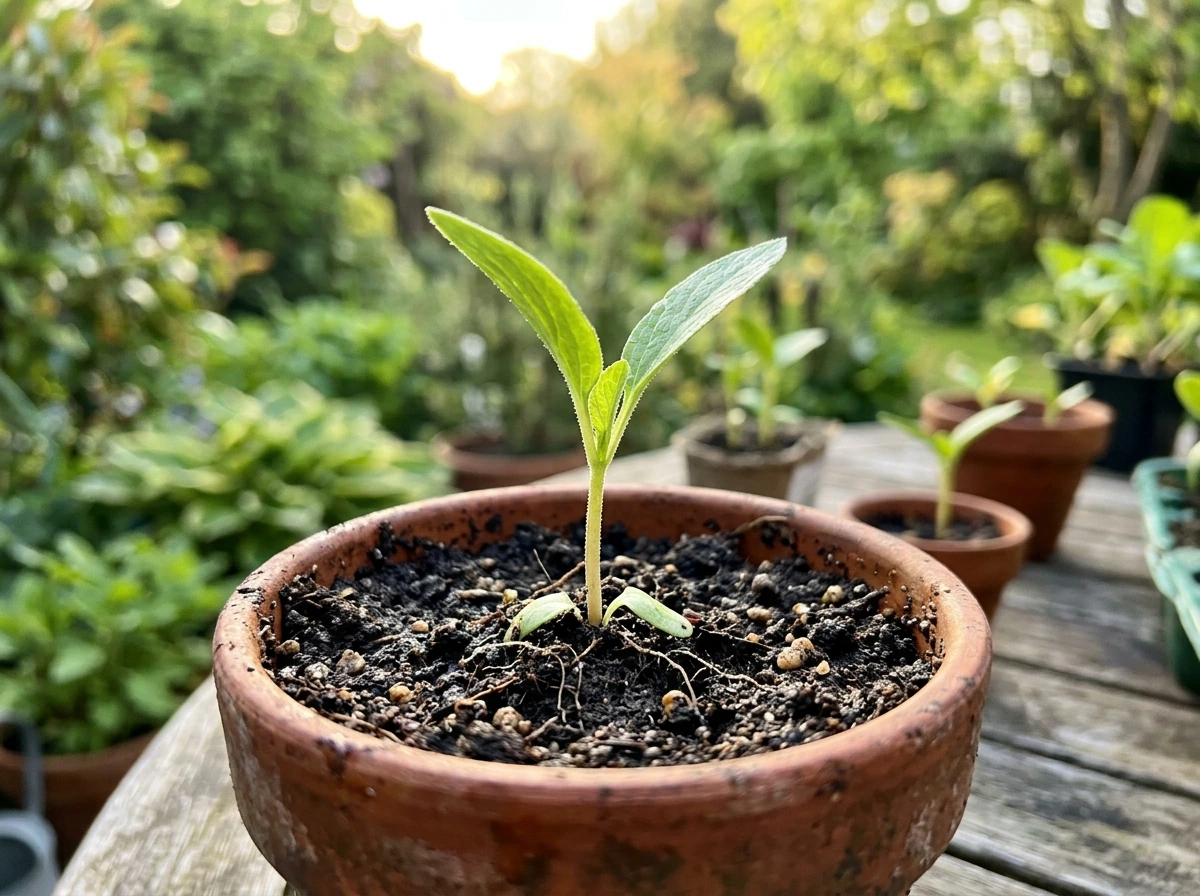
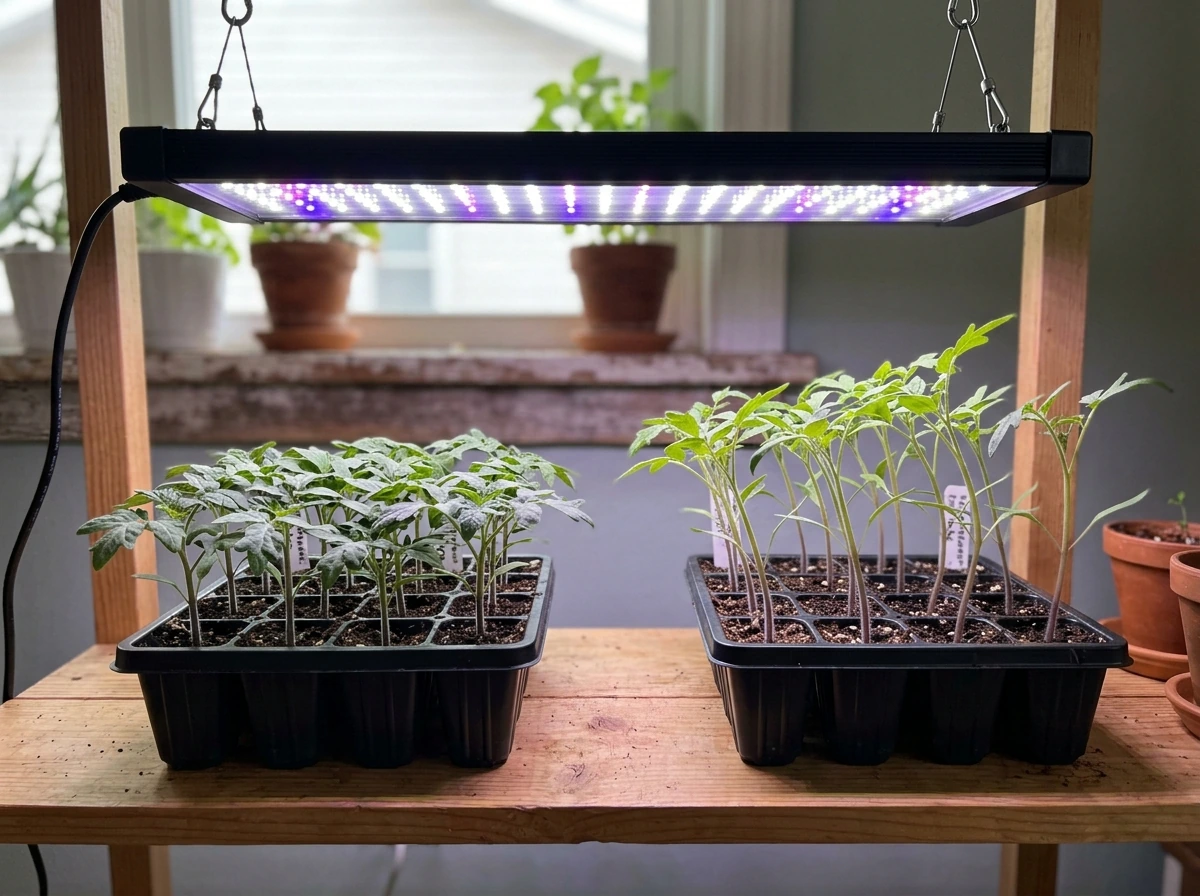
Once the shoot breaks the soil surface and opens its first leaves (called cotyledons), the plant switches from living off stored seed energy to making its own food through photosynthesis. This is when light becomes critical. The seedling is also building its first true root system, so the growing medium needs to be consistently moist but never waterlogged, roots need oxygen as much as they need water. This stage lasts roughly one to three weeks depending on the crop.
Stage 3: Vegetative growth
The plant is now in growth mode. It's stacking leaves, thickening stems, and extending roots. This is when crops put on the most bulk, and it's also when they're hungriest for nitrogen, the nutrient most responsible for leaf and stem growth. For fast-maturing leafy greens like lettuce and spinach, this stage essentially is the whole crop, they're ready to harvest in about 40–60 days. For fruiting crops like tomatoes and beans, the vegetative stage is just the buildup.
Stage 4: Flowering and pollination
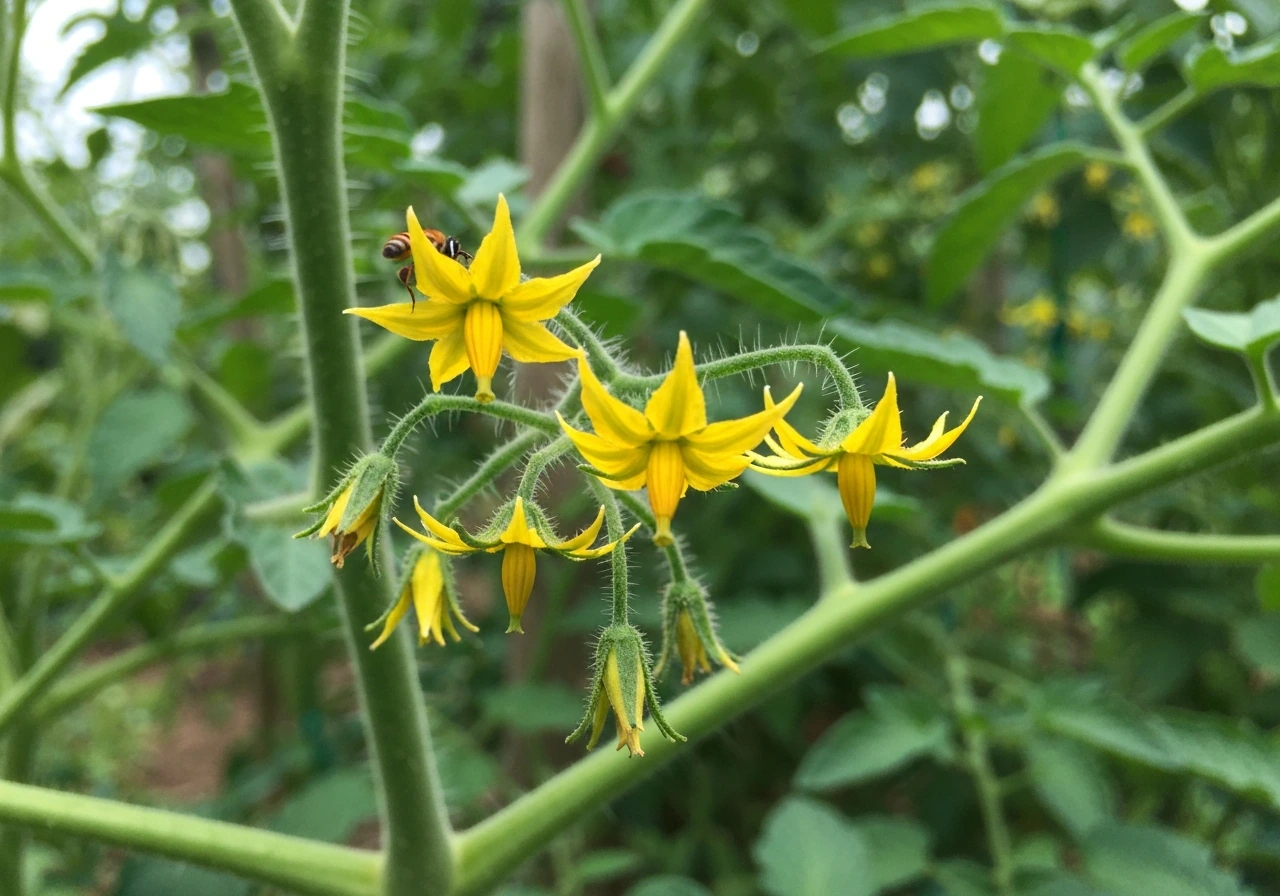
The plant shifts energy from building leaves to producing flowers. This is the most temperature-sensitive stage for most crops. Tomatoes set fruit best between 80–90°F during the day; at 100°F, flowers simply won't set. Night temperatures also matter, tomato fruit set drops off below about 45–55°F at night. Legumes like beans and peas have similar windows, and heat spikes during flowering can cause split-set, pod curvature, or stringy pods. Outdoor crops get pollinated by wind or insects; indoor crops often need a gentle shake or a small fan to move pollen.
Stage 5: Fruit and seed development
After pollination, the plant redirects energy into swelling fruits or filling seeds. Phosphorus and potassium become more important here than nitrogen, too much nitrogen at this stage actually delays or reduces fruiting. For dry beans, the optimum average growing temperature during pod-fill is 65–75°F, and the process continues as long as temperature and soil moisture allow. Consistent watering is especially critical during this stage because water stress directly reduces yield.
Stage 6: Maturity and harvest
The crop signals readiness through visual cues: color change, firmness, size, or for seeds, drying and hardening of the seed coat. Harvesting at the right time matters more than most beginners expect, early harvesting of fruiting crops encourages the plant to keep producing; leaving fruit on too long diverts energy away from new flowers.
What crops actually need to grow
Light
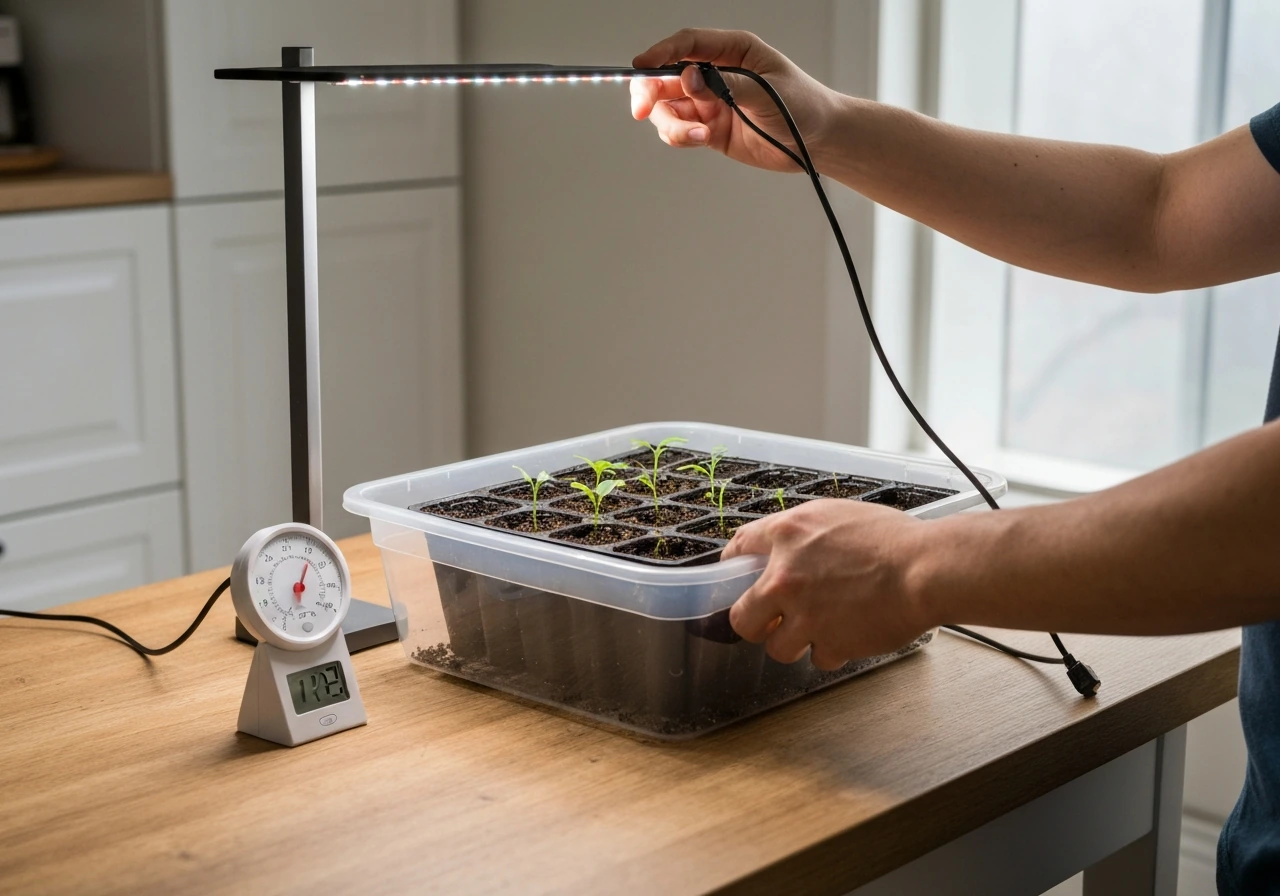
Light is the engine of the whole system. Plants use it to convert carbon dioxide and water into sugar (photosynthesis), and more light generally means more growth, up to a point. What matters is both intensity (how bright the light is, measured in PPFD or foot-candles) and duration (how many hours per day). Seedlings need lower intensity than mature fruiting plants. A general framework: seedlings do well under moderate light with 16–18 hours of coverage; vegetative crops push faster under higher intensity; flowering and fruiting crops need the most intense light to set and fill fruit properly. For indoor growing, full-spectrum LED grow lights are the most practical choice today. Outdoors, most fruiting crops want at least 6–8 hours of direct sun.
Water
Water does three jobs: it carries nutrients into the root zone, it keeps plant cells pressurized (turgor), and it's a raw ingredient in photosynthesis. The biggest beginner mistake is overwatering, more on that in the troubleshooting section. The frequency you need depends entirely on your growing medium. Soil holds water longer; soilless mixes dry faster; hydroponics delivers water continuously. The right approach is to water based on the plant and medium, not on a fixed schedule.
Nutrients
The three macronutrients crops need in the largest amounts are nitrogen (N), phosphorus (P), and potassium (K). Nitrogen drives leafy growth. Phosphorus supports root development and fruit/seed set. Potassium helps with overall plant health, water regulation, and fruit quality. Beyond those three, crops also need calcium, magnesium, sulfur, and a range of micronutrients (iron, manganese, zinc, and others) in smaller amounts. In soil, many of these come from organic matter and the soil's natural chemistry. In hydroponics or containers with inert media, you have to supply all of them through your nutrient solution.
Temperature
Temperature controls the speed of nearly every biological process in a plant. Too cold, and enzyme activity slows, seeds won't germinate, roots stop absorbing nutrients, and growth stalls. Too hot, and protein structures break down, flowers fail to set, and the plant goes into stress. Most vegetable crops have a preferred range of roughly 60–85°F for active growth, but the specifics vary: germination likes 75–90°F in the soil, tomato fruit set needs a minimum night temperature of about 45–55°F and fails above 100°F during the day, and cool-season crops like lettuce and peas actually prefer temperatures in the 55–70°F range.
Oxygen at the roots
This one gets overlooked. Roots breathe. They need oxygen to absorb water and nutrients efficiently, which is why compacted soil or waterlogged growing media kills plants. In hydroponic systems, dissolved oxygen (DO) in the water is a critical measurement, over 6 ppm is the target for healthy root function. In soil and containers, you maintain oxygen access by using well-draining mixes and avoiding overwatering.
Germination and early root growth: the details that matter
Getting seeds to sprout reliably is about hitting three conditions at once: the right temperature, consistent moisture, and appropriate planting depth. A good rule of thumb for planting depth is about two to four times the diameter of the seed, so a large bean goes in about an inch deep, while a tiny lettuce seed barely gets covered. Most seeds don't need light to germinate, so you can start containers in a warm, dark spot, then move them under lights as soon as you see the first sprout poking through.
Once sprouted, the seedling needs light almost immediately and slightly cooler temperatures than during germination, keeping it too warm and dim causes etiolation (leggy, weak stretching toward any available light). The most common startup mistake besides overwatering is starting seeds in heavy garden soil or unfinished compost, both of which compact easily, hold too much water, and harbor the pathogens that cause damping-off.
Damping-off is worth naming specifically because it kills more seedlings than almost anything else. It's caused by fungal and water-mold pathogens that thrive in cool, wet, poorly drained conditions. Infected seedlings look fine one day and then topple over at the soil line the next, stem pinched and rotted. Prevention is simple: use a sterile seed-starting mix (not garden soil), don't overwater, and make sure there's airflow around your seedlings. There's no good cure once damping-off hits a flat, remove affected seedlings immediately and start fresh.
How the growing medium changes everything
The biology of the plant stays the same regardless of what you're growing in, but the way you manage water, nutrients, oxygen, and pH shifts significantly depending on your setup. Here's a direct comparison:
| Growing Setup | Watering Approach | Nutrient Delivery | pH Range | Key Monitoring |
|---|---|---|---|---|
| Soil (in-ground) | When top 1–2 inches dry out; rain-dependent | Pre-amended soil + periodic fertilizer applications | 6.0–7.0 for most crops | Soil moisture, fertilizer timing by growth stage |
| Containers / Raised Beds | More frequent than in-ground; check daily in heat | Liquid or granular fertilizer; nutrients leach faster | 6.0–7.0 (slightly lower for some crops) | Moisture, drainage, signs of deficiency |
| Hydroponics (recirculating) | Continuous or timed pump cycles | Complete nutrient solution; adjust EC and pH regularly | 5.0–6.0 | EC (target 1.5–3.0 mS/cm), pH, dissolved oxygen |
| Water Culture / DWC | Roots submerged; top off reservoir | Full nutrient solution in reservoir | 5.0–6.0 | DO (target >6 ppm), water temperature, EC, pH |
| Terrariums / Indoor Microclimates | Misting or minimal watering; high ambient humidity | Very light feeding; slow-release amendments | Varies by crop; monitor with strips | Humidity, airflow, light intensity, temperature |
In soil, the organic matter and clay particles act as a buffer, they hold nutrients and resist sudden pH swings. In hydroponics, there's no such buffer. pH and EC drift constantly as plants pull nutrients out of the solution and as water evaporates, so you're checking and adjusting every day or two. That's not a flaw, it's just the reality of the system, and once you're in the habit it takes about five minutes.
Terrariums deserve a special mention because they're often used for smaller edible herbs or microgreens rather than full fruiting crops. The sealed or semi-sealed environment creates high humidity, which can be great for germination but tricky for disease management. If you're growing crops in a terrarium-style setup indoors, prioritize airflow and lean toward crops that tolerate humidity well, like herbs and leafy greens.
A practical grow plan you can start today
Step 1: Pick the right crop for your setup
Match the crop to what you can actually provide. If you have a sunny window or a grow light and limited space, leafy greens (lettuce, spinach, kale) are the fastest and most forgiving, 40–60 days from seed to harvest. If you have outdoor space and warm summers, tomatoes, beans, and cucumbers are more rewarding but need more management. Beginners in any setup should start with a fast-maturing crop to build confidence before moving to longer-season fruiting plants.
Step 2: Set up your growing medium and containers
For soil or containers, use a quality potting mix (not garden soil for containers) with good drainage. Make sure any pot has drainage holes. For hydroponics or DWC, fill and test your reservoir before adding plants, get your pH to the 5.0–6.0 range and your EC to 1.5–2.0 mS/cm for seedlings (you can push it higher for established plants). For an indoor or terrarium setup, use a light, well-draining substrate and plan for how you'll manage humidity.
Step 3: Start seeds correctly
Sow seeds at the depth on the packet (or use the 2–4x diameter rule). Keep the medium consistently moist, not soaked, and keep the temperature in the 75–90°F range. Sow seeds at the depth on the packet (or use the 2–4x diameter rule). Keep the medium consistently moist, not soaked, and keep the temperature in the 75–90°F range. A seedling heat mat under your trays makes a huge difference if your space runs cool. Most seeds don't need light until they sprout, so a warm cupboard works fine. Once you see the first green, move them to your light source immediately. Most seeds don't need light until they sprout, so a warm cupboard works fine. Once you see the first green, move them to your light source immediately.
Step 4: Get the light right
Outdoors, place crops in the sunniest spot available, most fruiting crops need 6–8 hours of direct sun. Indoors, place grow lights close enough to deliver useful intensity (check manufacturer specs for distance) and run them 14–18 hours per day for seedlings and leafy greens, 12–14 hours for fruiting crops once they're established. Rotate containers regularly if light coverage is uneven.
Step 5: Build a feeding schedule by growth stage
Fertilization timing matters more than most beginners realize. A practical framework for vegetable crops in soil or containers: start with a balanced fertilizer (equal or close N-P-K) during seedling and early vegetative stages, then shift to a lower-nitrogen, higher-phosphorus and potassium formula once flowering begins. For leafy greens, apply fertilizer when plants are about one-third of their full size. For tomatoes, follow a regular nitrogen-phosphorus-potassium schedule based on plant development. For beans and peas, hold off on extra nitrogen fertilizer until after bloom and pod set, legumes fix their own nitrogen from the air and extra N just makes them leafy.
Step 6: Monitor consistently
Build a habit of checking your plants at the same time each day. For soil growers, press a finger an inch into the soil, water when it feels dry at that depth. For hydroponic systems, check pH and EC every one to two days; check dissolved oxygen and water temperature at least every few days. Look at leaf color from the bottom of the plant up, older lower leaves show deficiency symptoms first. Catch problems at the early stage and they're almost always fixable.
Diagnosing and fixing common crop problems
Slow or no germination
The most common cause is temperature. If your soil or medium is below 65°F, most vegetable seeds will germinate very slowly or not at all. Check with a soil thermometer, they're cheap and worth having. The second most common cause is that seeds dried out during germination (the medium was watered once and then neglected). Seeds need consistent moisture throughout the entire germination window, which can be 5–14 days depending on the crop. Plastic wrap or a humidity dome over the tray solves this without much effort.
Yellowing leaves
Yellowing that starts on the oldest, lowest leaves and moves upward is a classic sign of nitrogen deficiency, nitrogen is mobile in plants, so they pull it from old tissue to feed new growth when supply runs low. The fix is a nitrogen-rich fertilizer application. But before you feed, consider whether the real problem might be pH, if your soil or nutrient solution is too acidic or alkaline, nutrients can be present but chemically unavailable to roots (this is called nutrient lockout). Test pH first, correct it if needed, then assess whether feeding is still necessary.
Wilting: overwatering vs underwatering
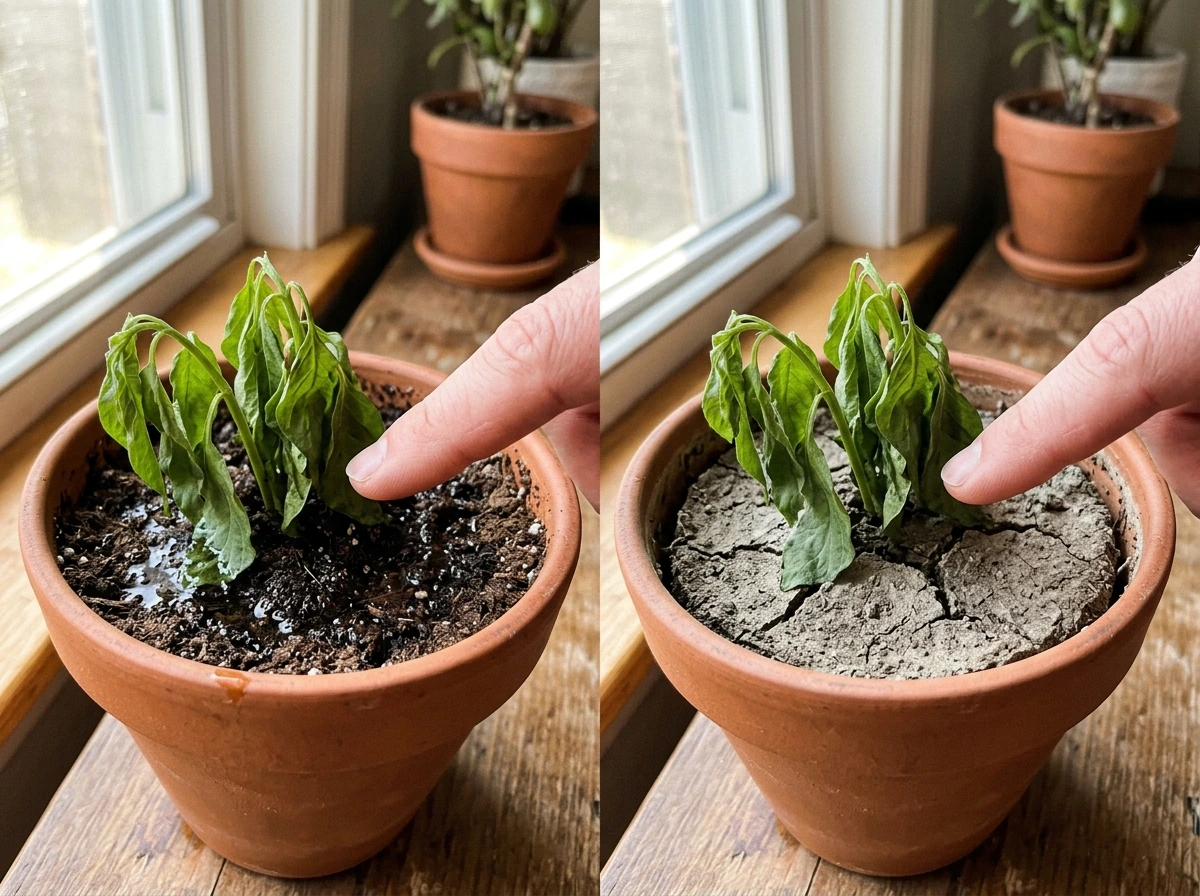
Both cause wilting, and they look identical at a glance. Here's how to tell them apart: stick your finger an inch into the medium. If it's wet or soggy and the plant is wilting, you're overwatering, roots are suffocating. If it's bone dry, you're underwatering. An overwatered plant in wet soil that's wilting needs you to stop watering and improve drainage, not add more water. An underwatered plant in dry soil recovers quickly after a thorough watering. Chronically overwatered plants often have yellow lower leaves and mushy stems near the base, root rot is setting in.
Nutrient burn
Brown, crispy leaf tips, especially on the newest growth, usually indicate nutrient burn. You've pushed the concentration too high, either by over-fertilizing in soil or by letting EC creep too high in a hydroponic system. In soil, flush the medium with plain water a few times to dilute the salt buildup. In hydroponics, dilute your reservoir by adding fresh water until EC comes back down to the appropriate range. Going forward, it's much easier to add nutrients gradually than to deal with burn and flush.
Heat and cold stress
Heat stress shows as wilting during the hottest part of the day even when soil is moist, brown leaf edges, and in fruiting crops, flower drop. Shade cloth, more frequent watering, and mulching the soil surface help significantly. Cold stress shows as purple-tinged leaves (especially in tomatoes), slow growth, and in severe cases, blackened tissue. If you're growing indoors and temperatures dip below 55°F at night, fruiting crops especially will struggle to set fruit. A simple min/max thermometer near your plants tells you exactly what temperatures they're actually experiencing.
Handling pests and disease without overreacting
Aphids
Aphids are small, soft-bodied insects that cluster on new growth and the undersides of leaves. They reproduce fast, scout at least twice a week during periods of rapid plant growth. For small infestations, a strong spray of water knocks them off effectively. For larger colonies, insecticidal soap or neem oil both work well but require thorough coverage of all leaf surfaces, including undersides, and repeat applications every five to seven days. Start with the least disruptive method first and escalate only if needed.
Fungus gnats
If you see tiny flies hovering around your soil, you almost certainly have fungus gnats. The adults are annoying but mostly harmless to established plants. The larvae are the problem, they feed on roots in the growing medium, which can seriously damage seedlings. Fungus gnats thrive in constantly moist soil, so the best prevention and treatment is simply letting the top layer of your medium dry out between waterings. Bottom-watering (filling a saucer and letting the medium wick water up from below) keeps the surface dry and removes the environment they need to breed. Sticky yellow traps catch adults and help you monitor population levels.
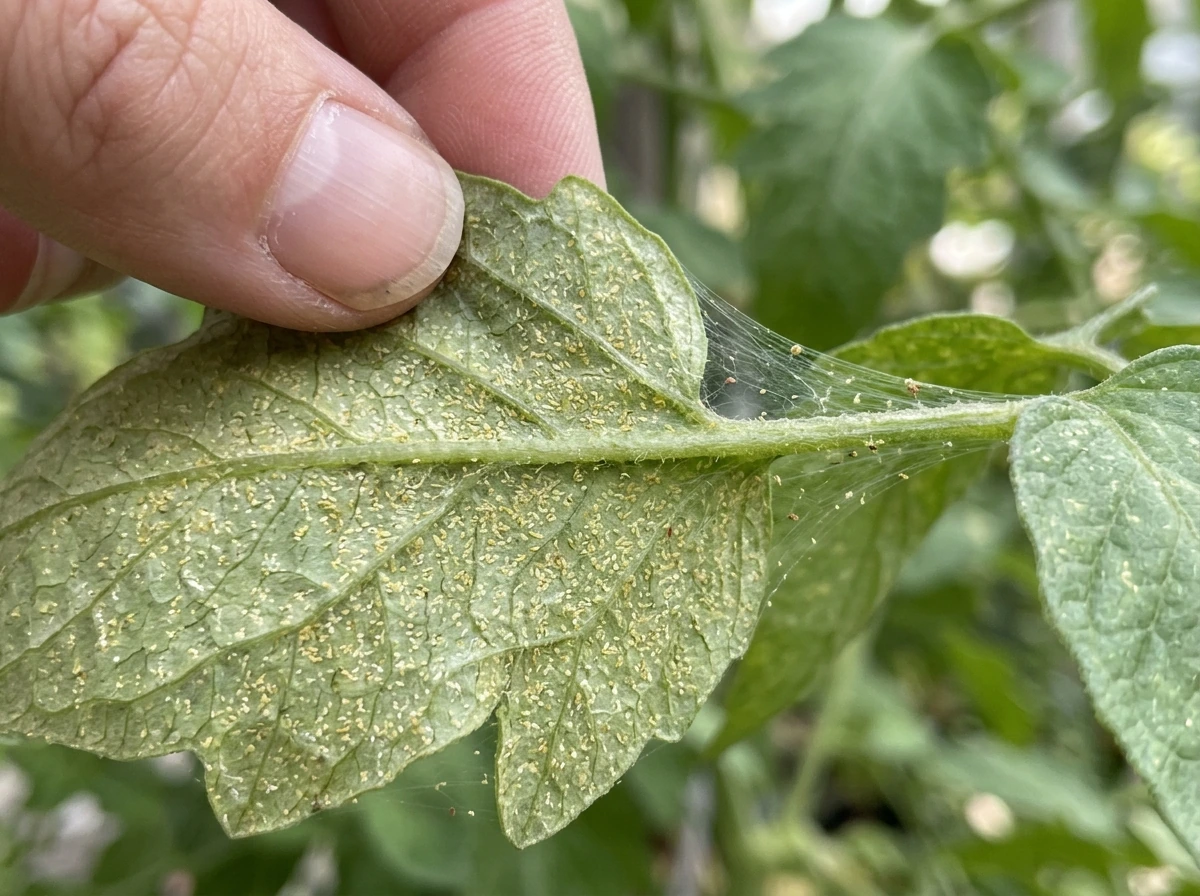
Spider mites
Spider mites are tiny and hard to see, but they leave characteristic stippling (tiny yellow or white dots) on leaf surfaces and fine webbing on the undersides of leaves in larger infestations. They thrive in hot, dry conditions, plants stressed by heat or underwatering are most vulnerable. Increasing humidity, improving airflow, and keeping plants well-watered helps prevent outbreaks. For active infestations, neem oil or insecticidal soap applied thoroughly and repeatedly are your best options indoors.
Botrytis (gray mold)
Gray mold is a fungal disease that looks like fuzzy gray patches on stems, leaves, or fruit. It's primarily a humidity and airflow problem. Botrytis needs free moisture on plant tissue for 8–12 continuous hours and thrives when relative humidity is above 85–93% with temperatures in the 55–65°F range. If you see it, remove affected tissue immediately, don't leave it in your growing space. The fix is almost always improving airflow with a small fan, reducing humidity, and avoiding getting foliage wet when watering. In enclosed indoor or terrarium setups, this is the disease to watch most carefully.
When to intervene vs when to wait
The general rule is: intervene early and lightly. A few aphids or one gnarly leaf aren't emergencies, monitor and see if the problem is expanding. A problem that's doubling in size every few days needs action now. If more than 30% of your plant's leaves are affected by a pest or disease, or if you see stunted new growth, collapsed stems, or rapid dieback, treat immediately and consider whether the plant is worth saving or whether removing it protects the rest of your crop. Document what you see and when, patterns across multiple growing cycles are how you get genuinely good at this.
What to measure, what to adjust, and when to change course
Growing crops well is mostly a monitoring game. You don't need to check everything constantly, but a few key measurements catch most problems before they become serious. Here's a practical checklist of what to track and how often:
- Soil or medium moisture: check daily, especially in containers and during hot weather
- Leaf color and condition: scan from the bottom up every time you water
- Temperature: check min and max at plant level, especially at night during flowering
- pH (hydroponics or containers with frequent flushing): every 1–2 days
- EC/nutrient concentration (hydroponics): every 1–2 days; adjust before it drifts too far
- Dissolved oxygen (DWC/water culture): check every few days; keep above 6 ppm
- Pest scouting: at least twice a week during active growth periods
When something looks wrong, adjust one variable at a time. If you change your watering frequency, your nutrient concentration, and your light schedule simultaneously, you won't know which change fixed or worsened the problem. Start with the most likely cause (check the pH before adding more fertilizer; check moisture before assuming deficiency), make one change, and give the plant 48–72 hours to respond before your next move. Plants communicate clearly once you know what to look for, and after a few growing cycles, you'll recognize most problems within seconds of spotting them.
FAQ
How do crops grow differently if I use soil versus hydroponics?
The growth sequence is the same, but you manage the inputs differently. In soil, the medium buffers nutrients and pH changes, so problems often develop more slowly. In hydroponics, pH and nutrient strength shift quickly as plants absorb and water evaporates, so you should expect to check and correct them on a tighter cadence, usually every day or two.
Do crops need darkness to grow, or can I leave lights on 24/7?
Seedlings and vegetative plants respond well to long light periods, but most crops still benefit from a regular dark interval. Continuous light can increase stress and tip the plant toward heat and moisture imbalance, especially indoors with higher-intensity LEDs. A practical approach is to follow a daily light schedule (for example, 12 to 18 hours depending on stage) and keep night temps from spiking.
What is the best way to water so roots get oxygen, not just moisture?
Aim for consistent moisture without keeping the root zone saturated. In soil or containers, use a medium that drains well and water until excess drains, then wait until the correct part of the medium dries before watering again. If you suspect oxygen issues, look for wilting with wet soil, and improve drainage rather than adding more water.
Why do seeds sprout slowly even when they look healthy?
The most common reason is soil or medium temperature being too cool, since germination is highly temperature-dependent. A second frequent cause is moisture inconsistency during the germination window, seeds need a continuous moist environment until the sprout emerges. Check temperature with a soil thermometer and keep humidity stable using a dome or plastic wrap early on.
How do I pick the right planting depth if seeds are different sizes in the same tray?
Use seed size as your depth guide, roughly 2 to 4 times the seed diameter. If you mix very small and large seeds, consider sowing them in separate trays or rows so each group gets an appropriate depth and moisture level, rather than forcing everything to share one condition.
Can I speed up crop growth by increasing fertilizer right away?
Usually not. More nutrients early can cause salt buildup and nutrient burn, especially in containers. Start with a balanced fertilizer during early growth, then shift form and nitrogen level when flowering begins. Also verify pH first because nutrients can be present but unavailable if pH is off, which looks like “deficiency” but is actually lockout.
How can I tell if wilting is from overwatering or underwatering when I am unsure?
Check the medium moisture at about an inch down. If it is wet or soggy and the plant wilts, you likely have overwatering and reduced oxygen. If it is bone dry, you likely have underwatering. Chronically overwatered plants often also show yellow lower leaves and mushy stems near the base.
What should I measure besides pH and EC to avoid root problems in hydroponics?
Dissolved oxygen (DO) and water temperature are especially important for root health. Even if pH and EC look fine, low oxygen can reduce nutrient uptake and stunt growth. If you are using DWC or similar systems, target healthy DO (commonly above 6 ppm) and keep reservoir temperature in a reasonable range for your crop.
Why do flowers drop or fail to set even when plants look green?
The most frequent causes are temperature extremes during flowering and inadequate pollen movement indoors. Many crops have narrow windows, tomatoes often set poorly above very hot daytime temperatures and if nights are too cold. If indoors, ensure pollen is transferred by gentle shaking or a small fan, and avoid letting indoor temps swing wildly.
Do legumes still need nitrogen fertilizer if they fix nitrogen?
They need far less supplemental nitrogen than non-legumes. Extra nitrogen often increases leafy growth at the expense of bloom and pods. A useful guideline is to hold back on additional nitrogen until after flowering begins, then adjust based on plant vigor and your observed leaf color.
How do I know when to harvest, beyond “it looks ready”?
Use specific readiness cues tied to the crop. Fruiting plants often continue producing if you harvest promptly, while leaving fruit too long can redirect energy away from new flowers. For seeds, look for drying and hardening of the seed coat as the readiness sign, not just pod color.
What is the quickest way to prevent damping-off in seed-starting?
Start with sterile seed-starting mix (not garden soil), keep moisture consistent without soaking, and maintain airflow around seedlings. Once damping-off starts, removal is usually the only effective step. If your seedlings keep failing, review temperature first and confirm the medium is not staying cool and wet.
How do I troubleshoot nutrient problems when leaves look “off”?
Before feeding, check pH because nutrient lockout can mimic deficiency symptoms. Also consider patterns, nitrogen deficiency typically starts on older lower leaves first because nitrogen is mobile in plants. If leaf tips brown and crisp, nutrient burn is more likely, the fix is to reduce concentration by diluting or flushing depending on your system.
What should I do if pests show up, should I treat immediately?
Start with early, proportional intervention. If the issue is minor and not spreading, monitoring can prevent unnecessary chemical stress. If more than roughly a third of leaves are affected, new growth collapses, or damage is accelerating quickly, then act immediately and consider whether removing a heavily compromised plant is the best protection for the rest of your crop.
Can I grow crops in a terrarium if it stays humid all the time?
It can work for herbs and microgreens, but high humidity increases disease risk and can limit airflow. Prioritize airflow, avoid crops that are extremely humidity-sensitive, and be selective about watering so you do not keep foliage wet for long periods. For edible herbs and leafy greens, terrariums can be advantageous if you manage ventilation.